Jenkins + Fastlane + 蒲公英 + iOS 自动化构建
前言
由于在项目的测试阶段,为了快速的测试需要频繁的打包发布,会耗费很多的时间。而且需要自己手动去配置很多证书和环境,在每次等待都备受煎熬,为了从这种折磨中脱离而出,便考虑使用持续化集成来进行自动打包。
持续集成是一种软件开发实践,即团队开发成员经常集成他们的工作,通常每个成员每天至少集成一次,也就意味着每天可能会发生多次集成。每次集成都通过自动化的构建(包括编译,发布,自动化测试)来验证,从而尽早地发现集成错误。
目前比较流行的自动化流程工具是Fastlane,Fastlane是用Ruby语言编写的一套自动化工具集和框架,每一个工具实际都对应一个Ruby脚本,用来执行某一个特定的任务,而Fastlane核心框架则允许使用者通过类似配置文件的形式,将不同的工具有机而灵活的结合在一起,从而形成一个个完整的自动化流程。到目前为止,Fastlane的工具集基本上涵盖了打包,签名,测试,部署,发布,库管理等等移动开发中涉及到的内容。
Jenkins
Jenkins安装
brew install jenkinsJenkins 常用命令
#启动jenkins
brew services start jenkins
#停止jenkins
brew services stop jenkins
#重启jenkins
brew services restart jenkins
#直接启动jenkins
jenkins
打开浏览器,输入localhost:8080,去相关路径找到密码复制进去即可
新建任务
点击 New Item,选择FreeStyle project,进入到任务配置界面
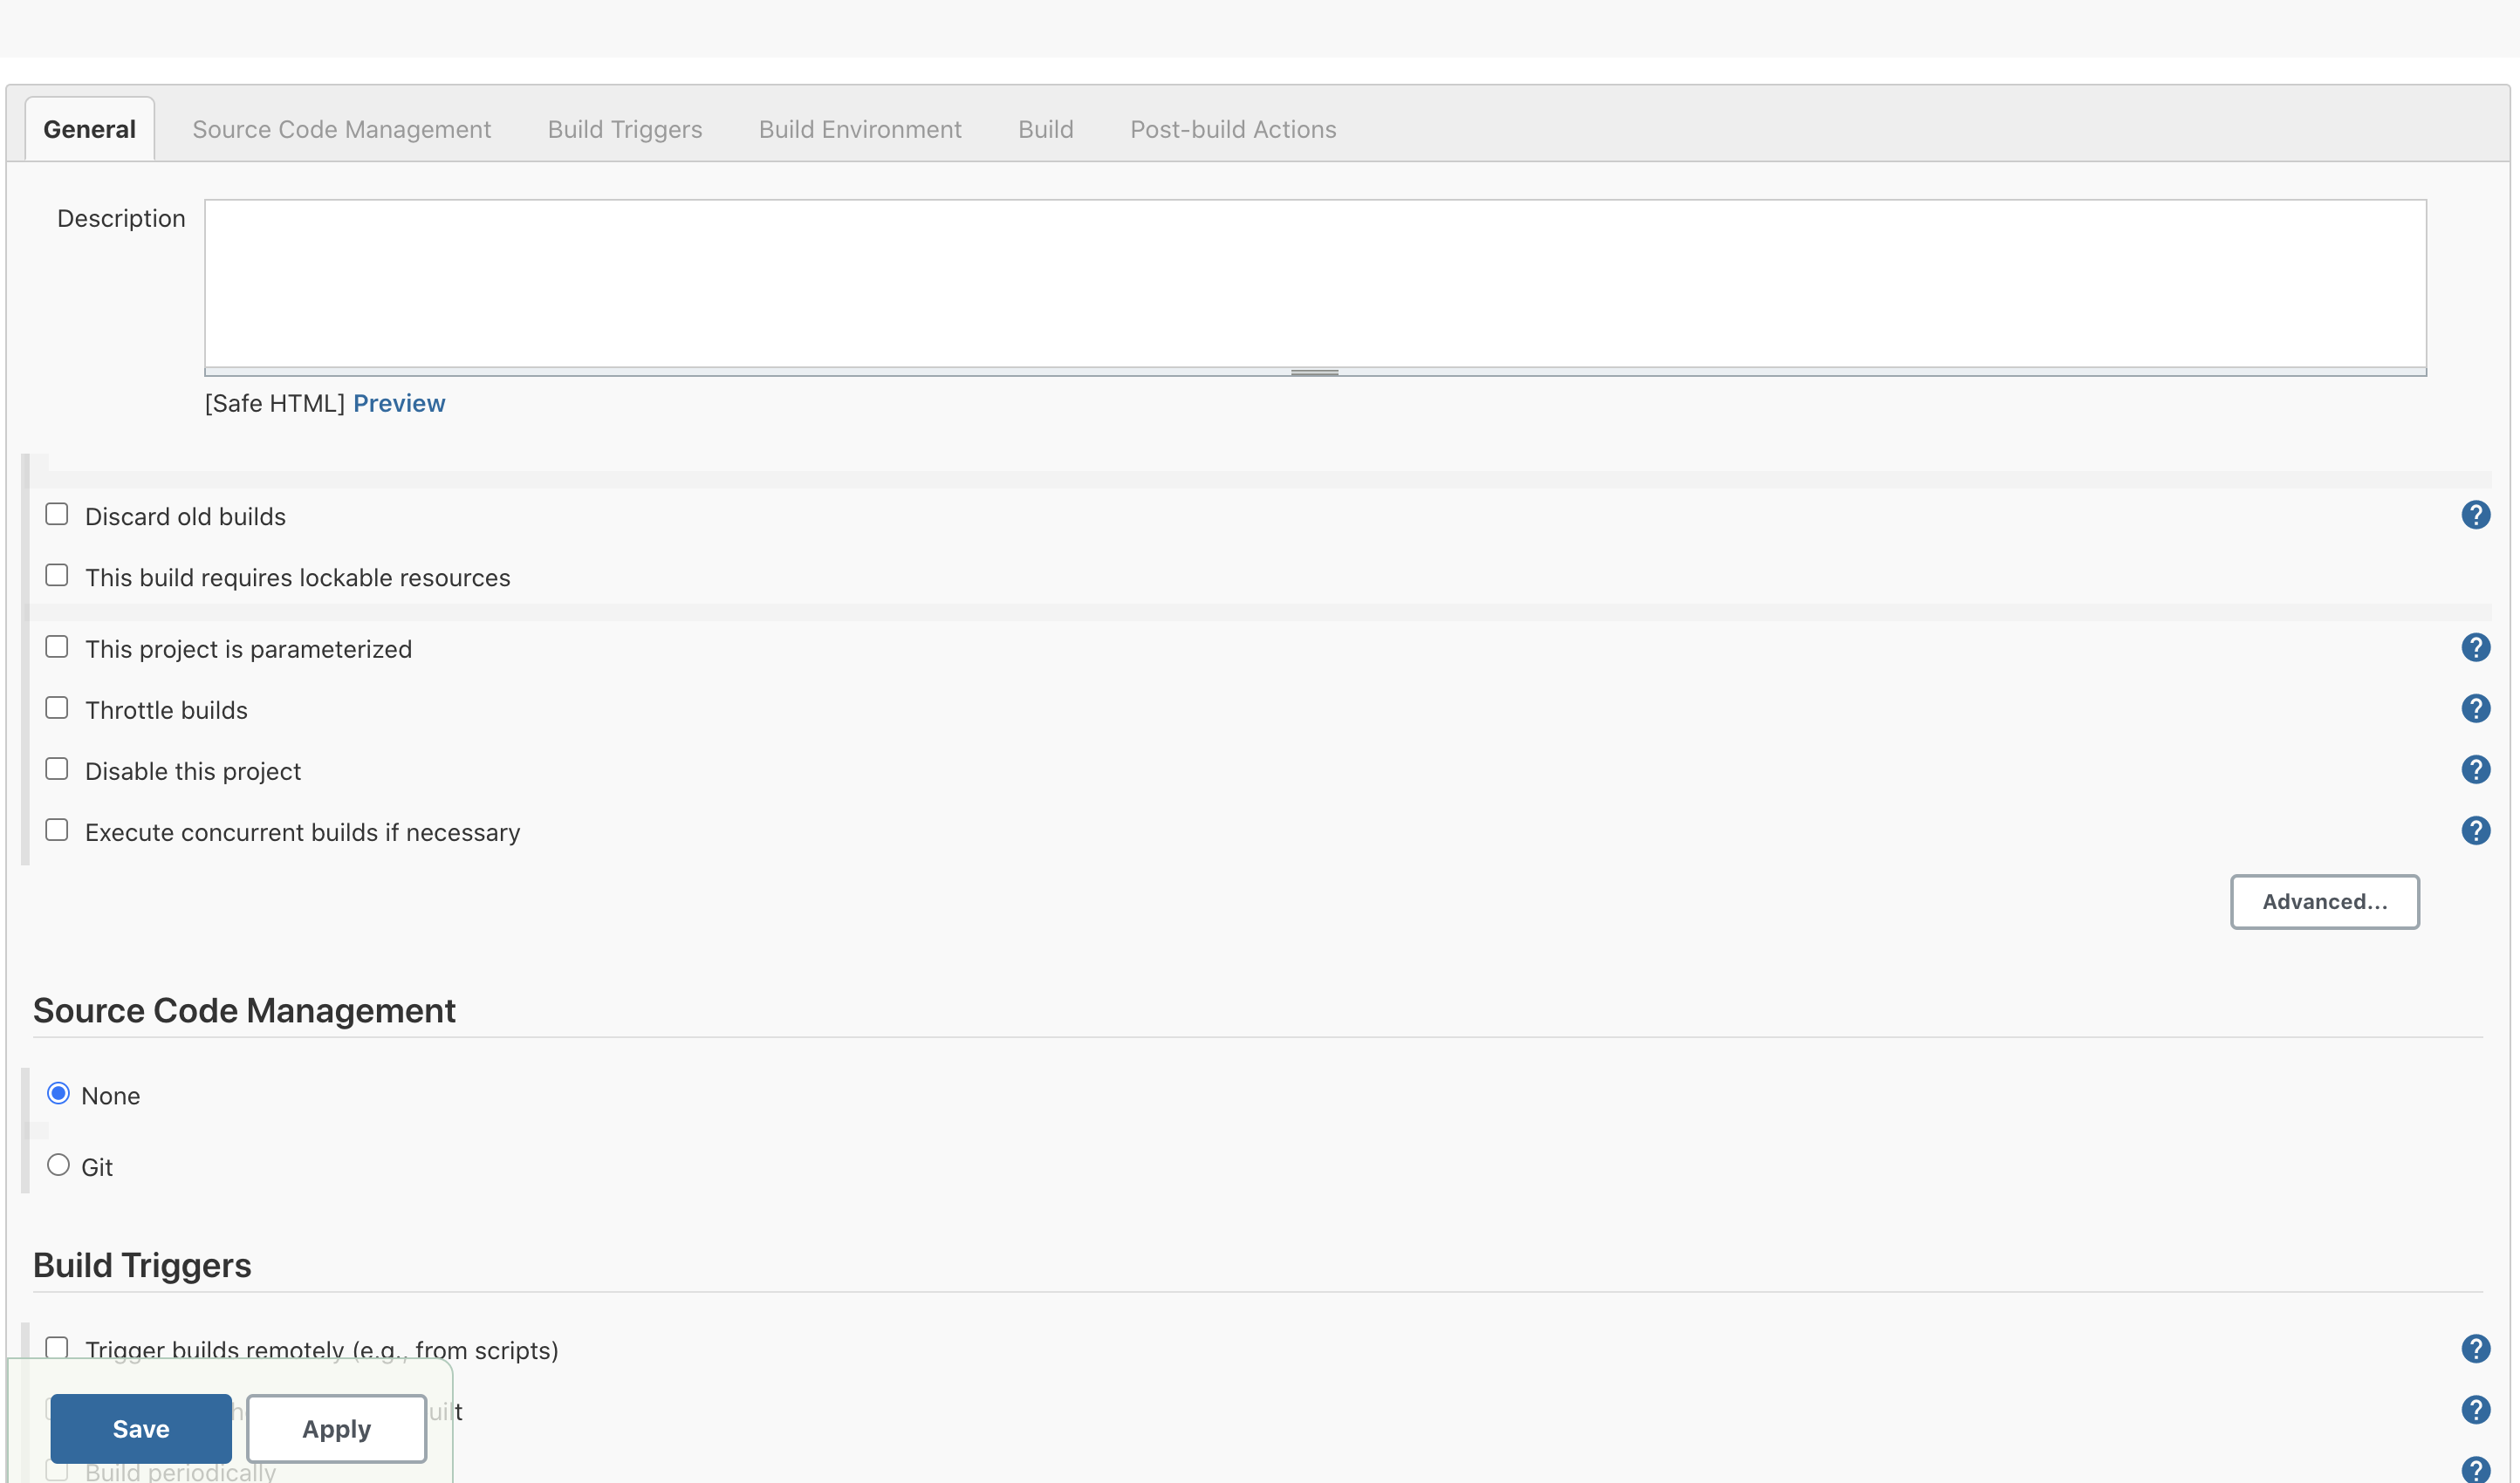
jenkins 配置
安装Git 参数插件
Manage Jenkins -> Plugin Manager ->Git Parameter,安装完成重启jenkins,进入任务配置界面,选择“源码管理”中的Git选项,输入git地址
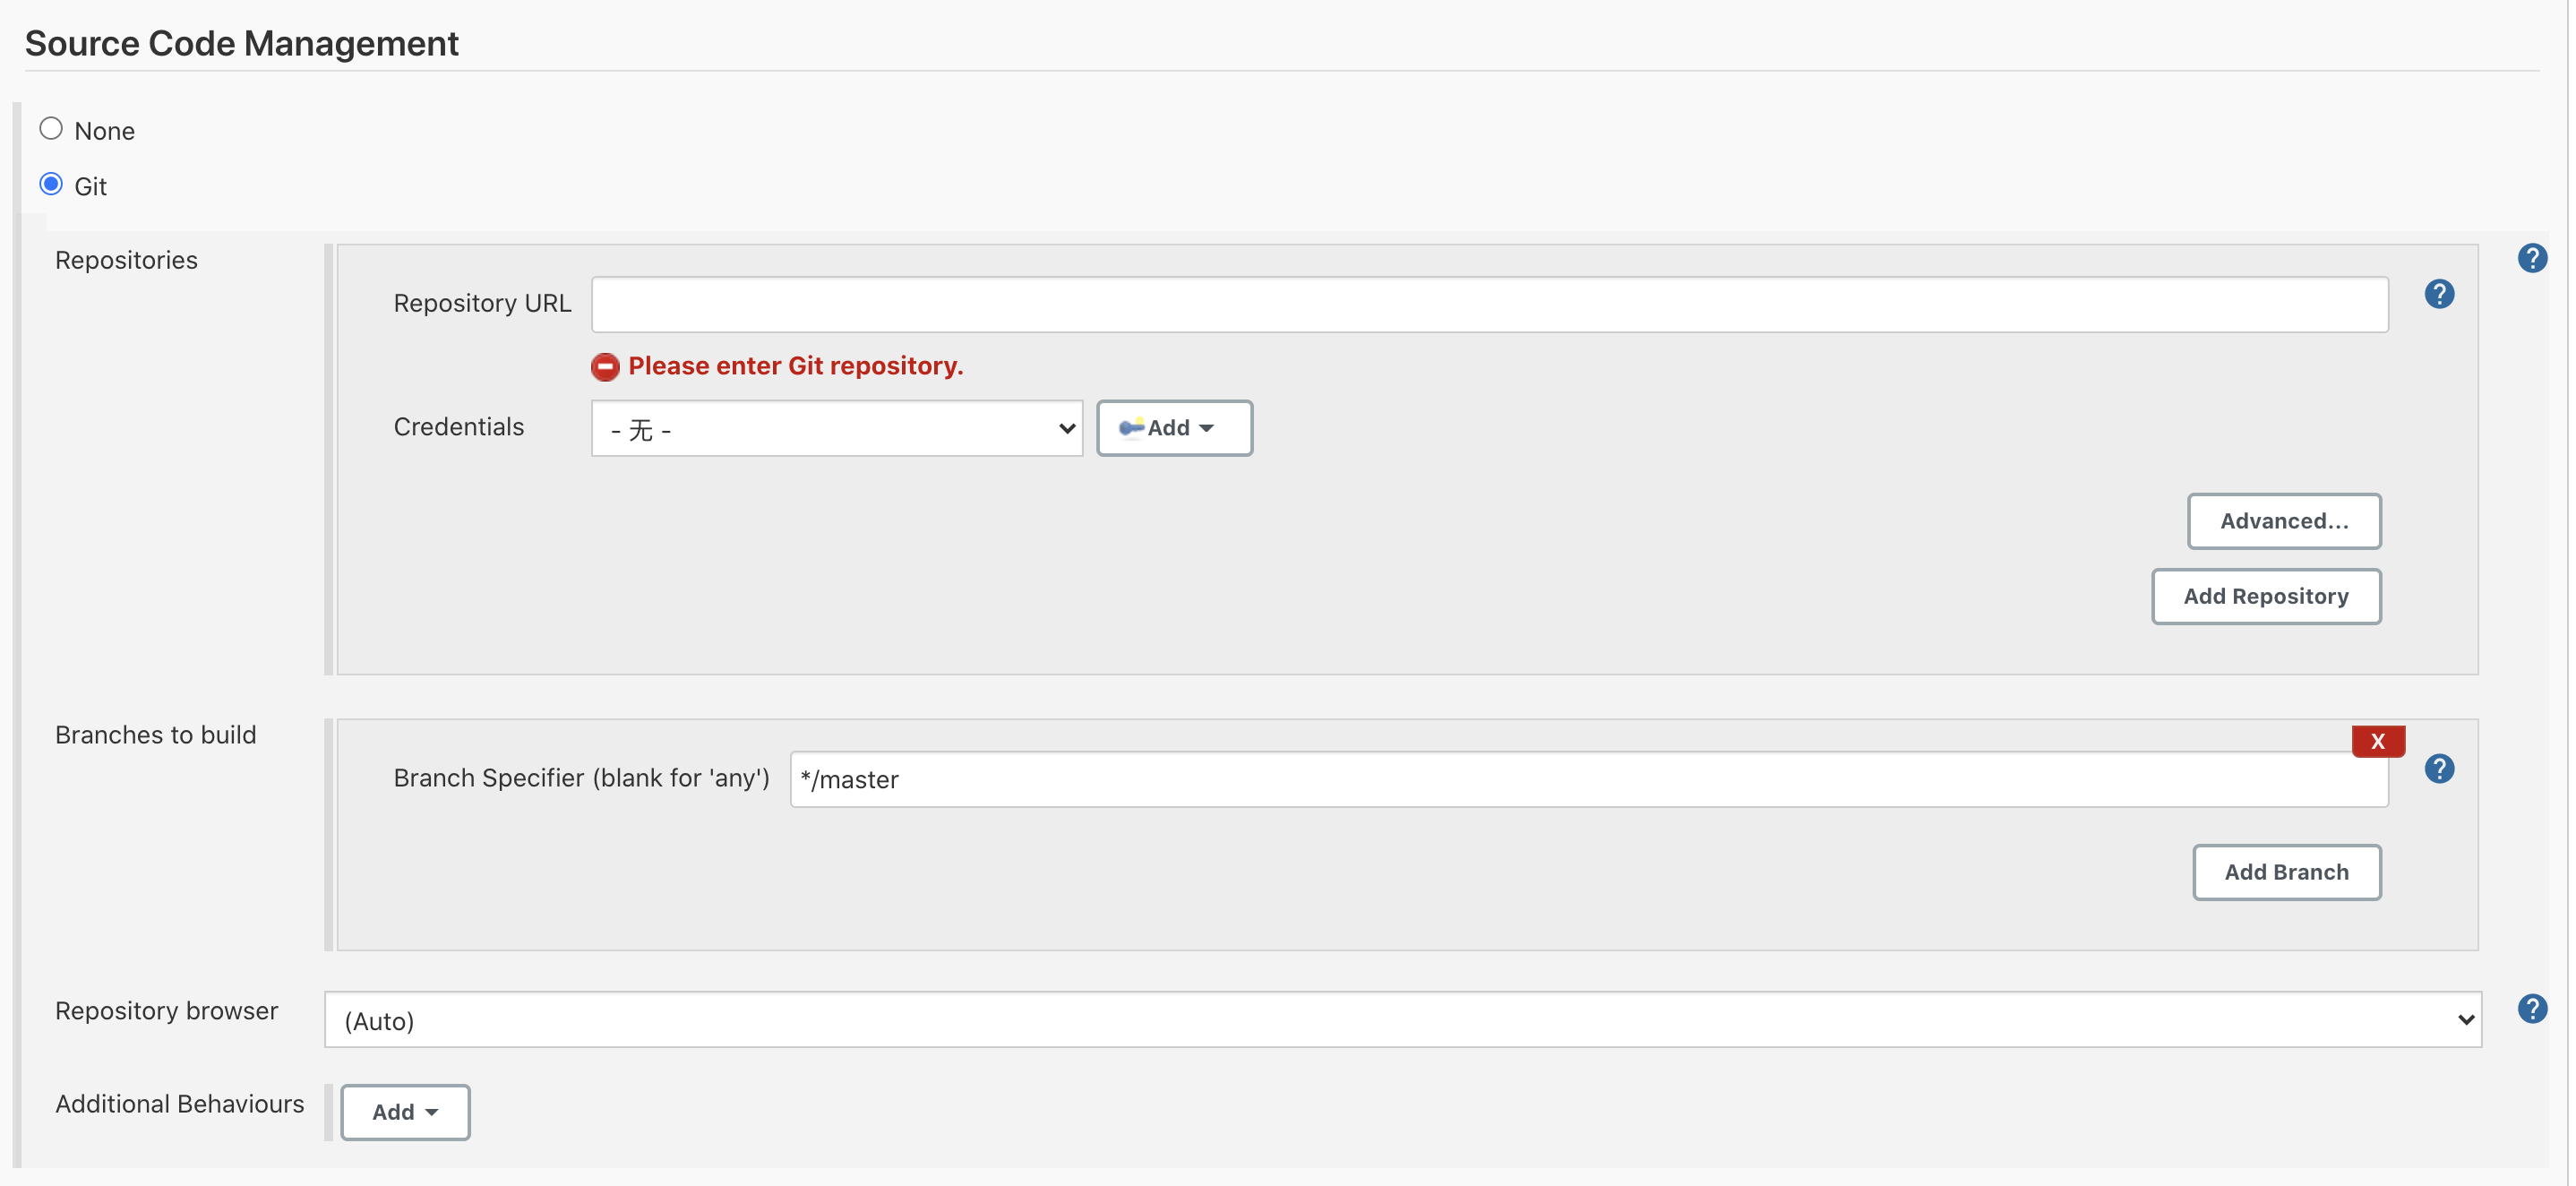
添加凭证(Credentials),输入git的账号密码
配置git的选择参数(如果不设置该步骤,默认选择master分支执行)选中
This project is parameterized按照下图输入,其中branch为自定义参数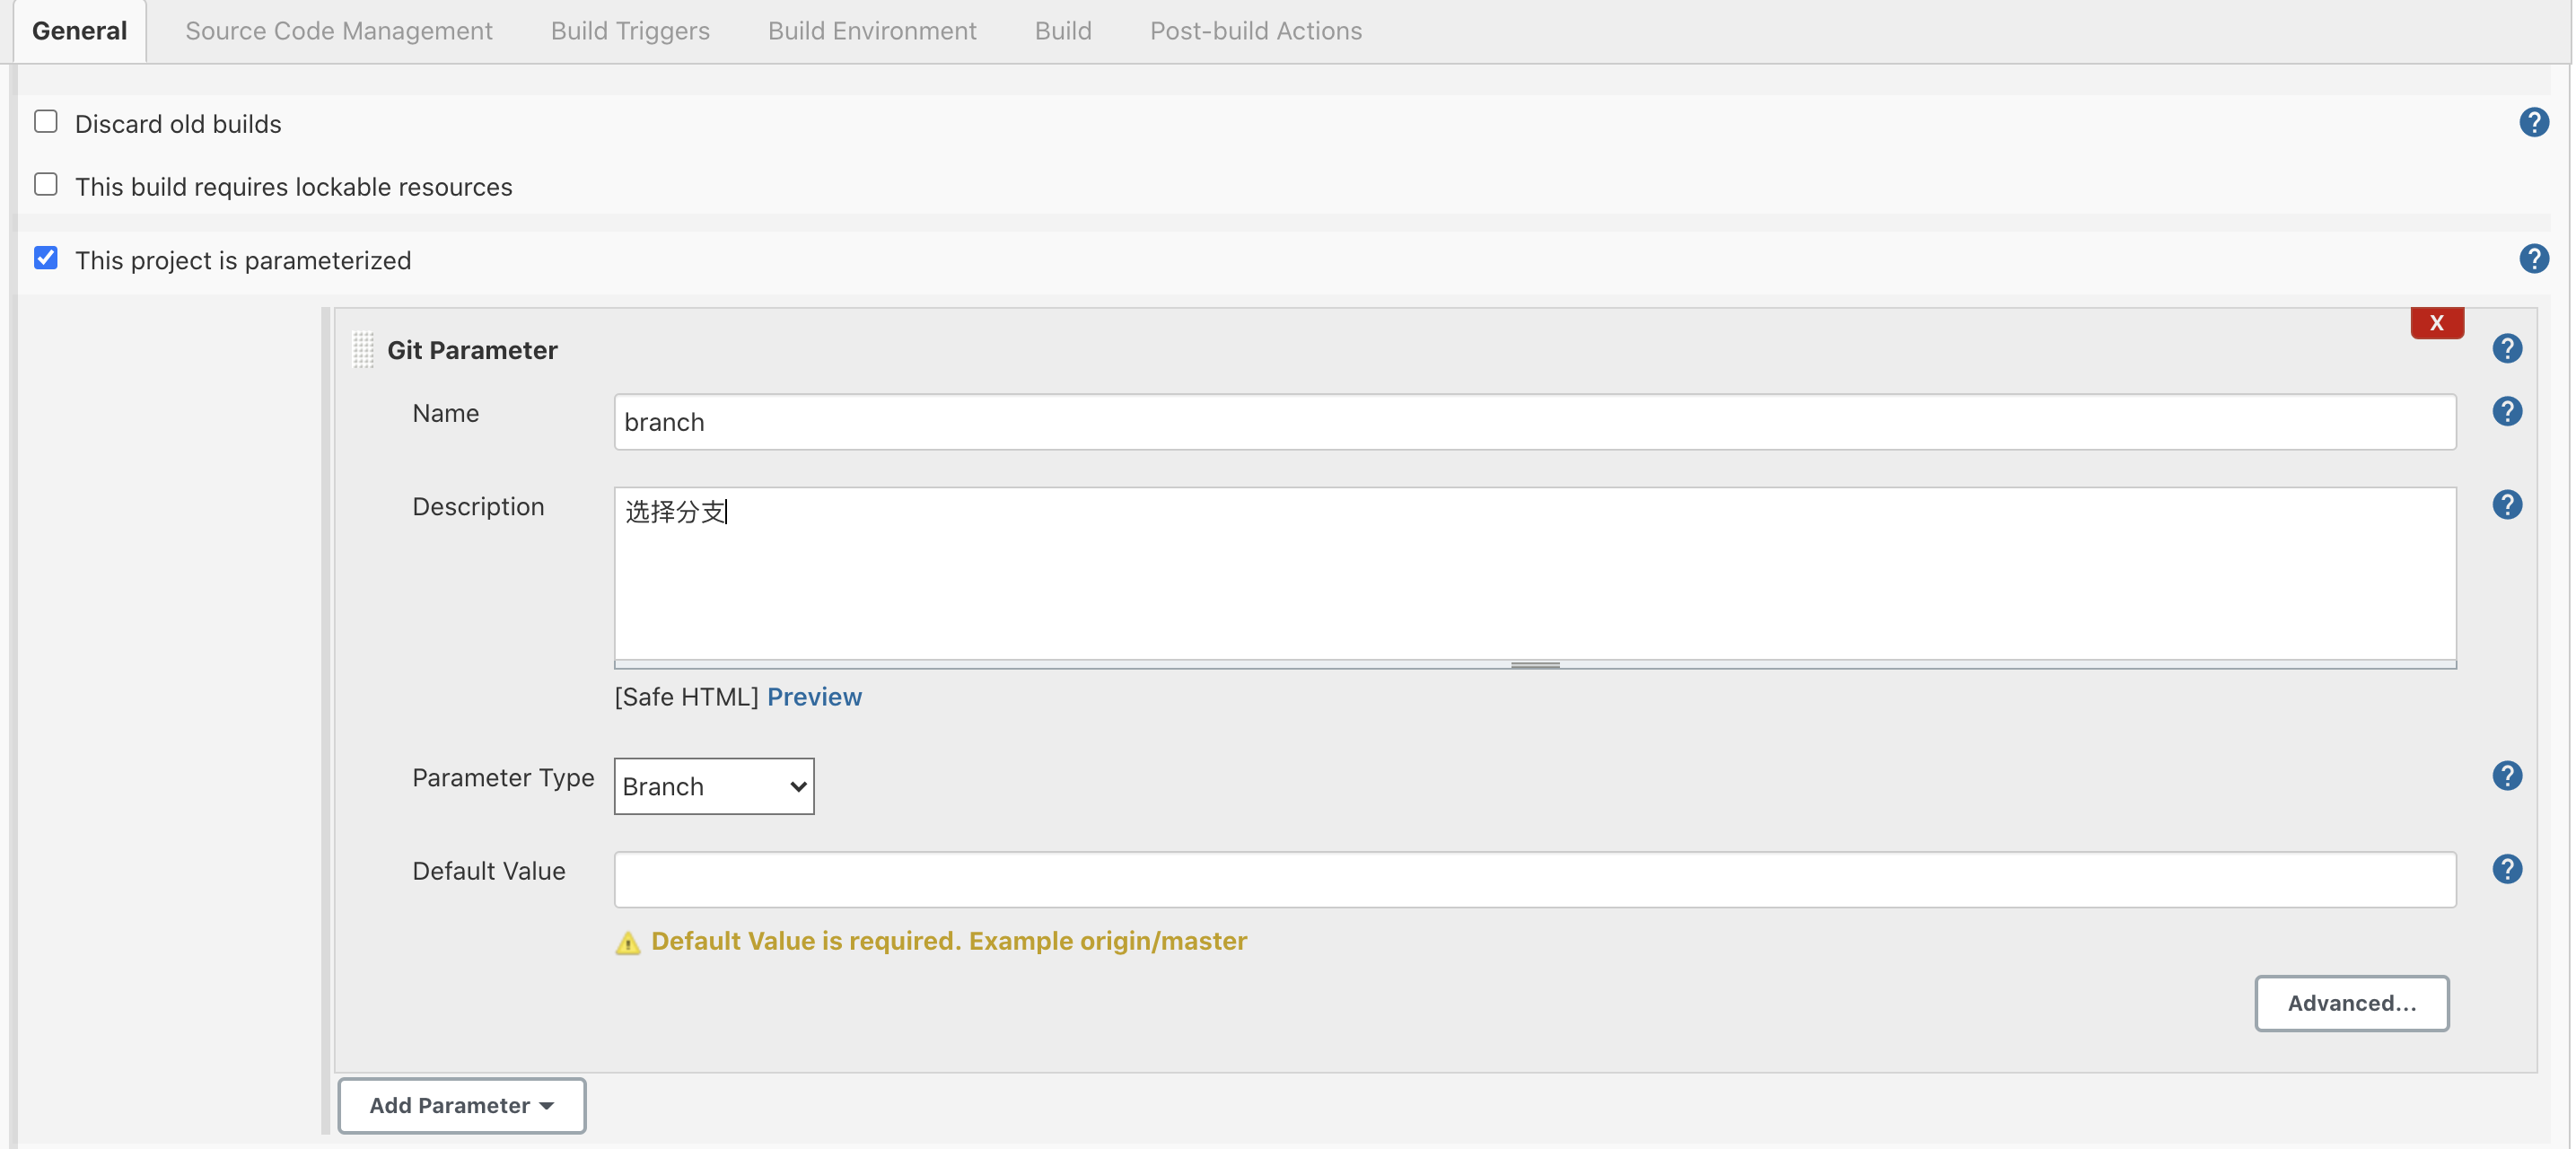
在下面Source Code Management 中使用${branch} 如下图,点击Apply。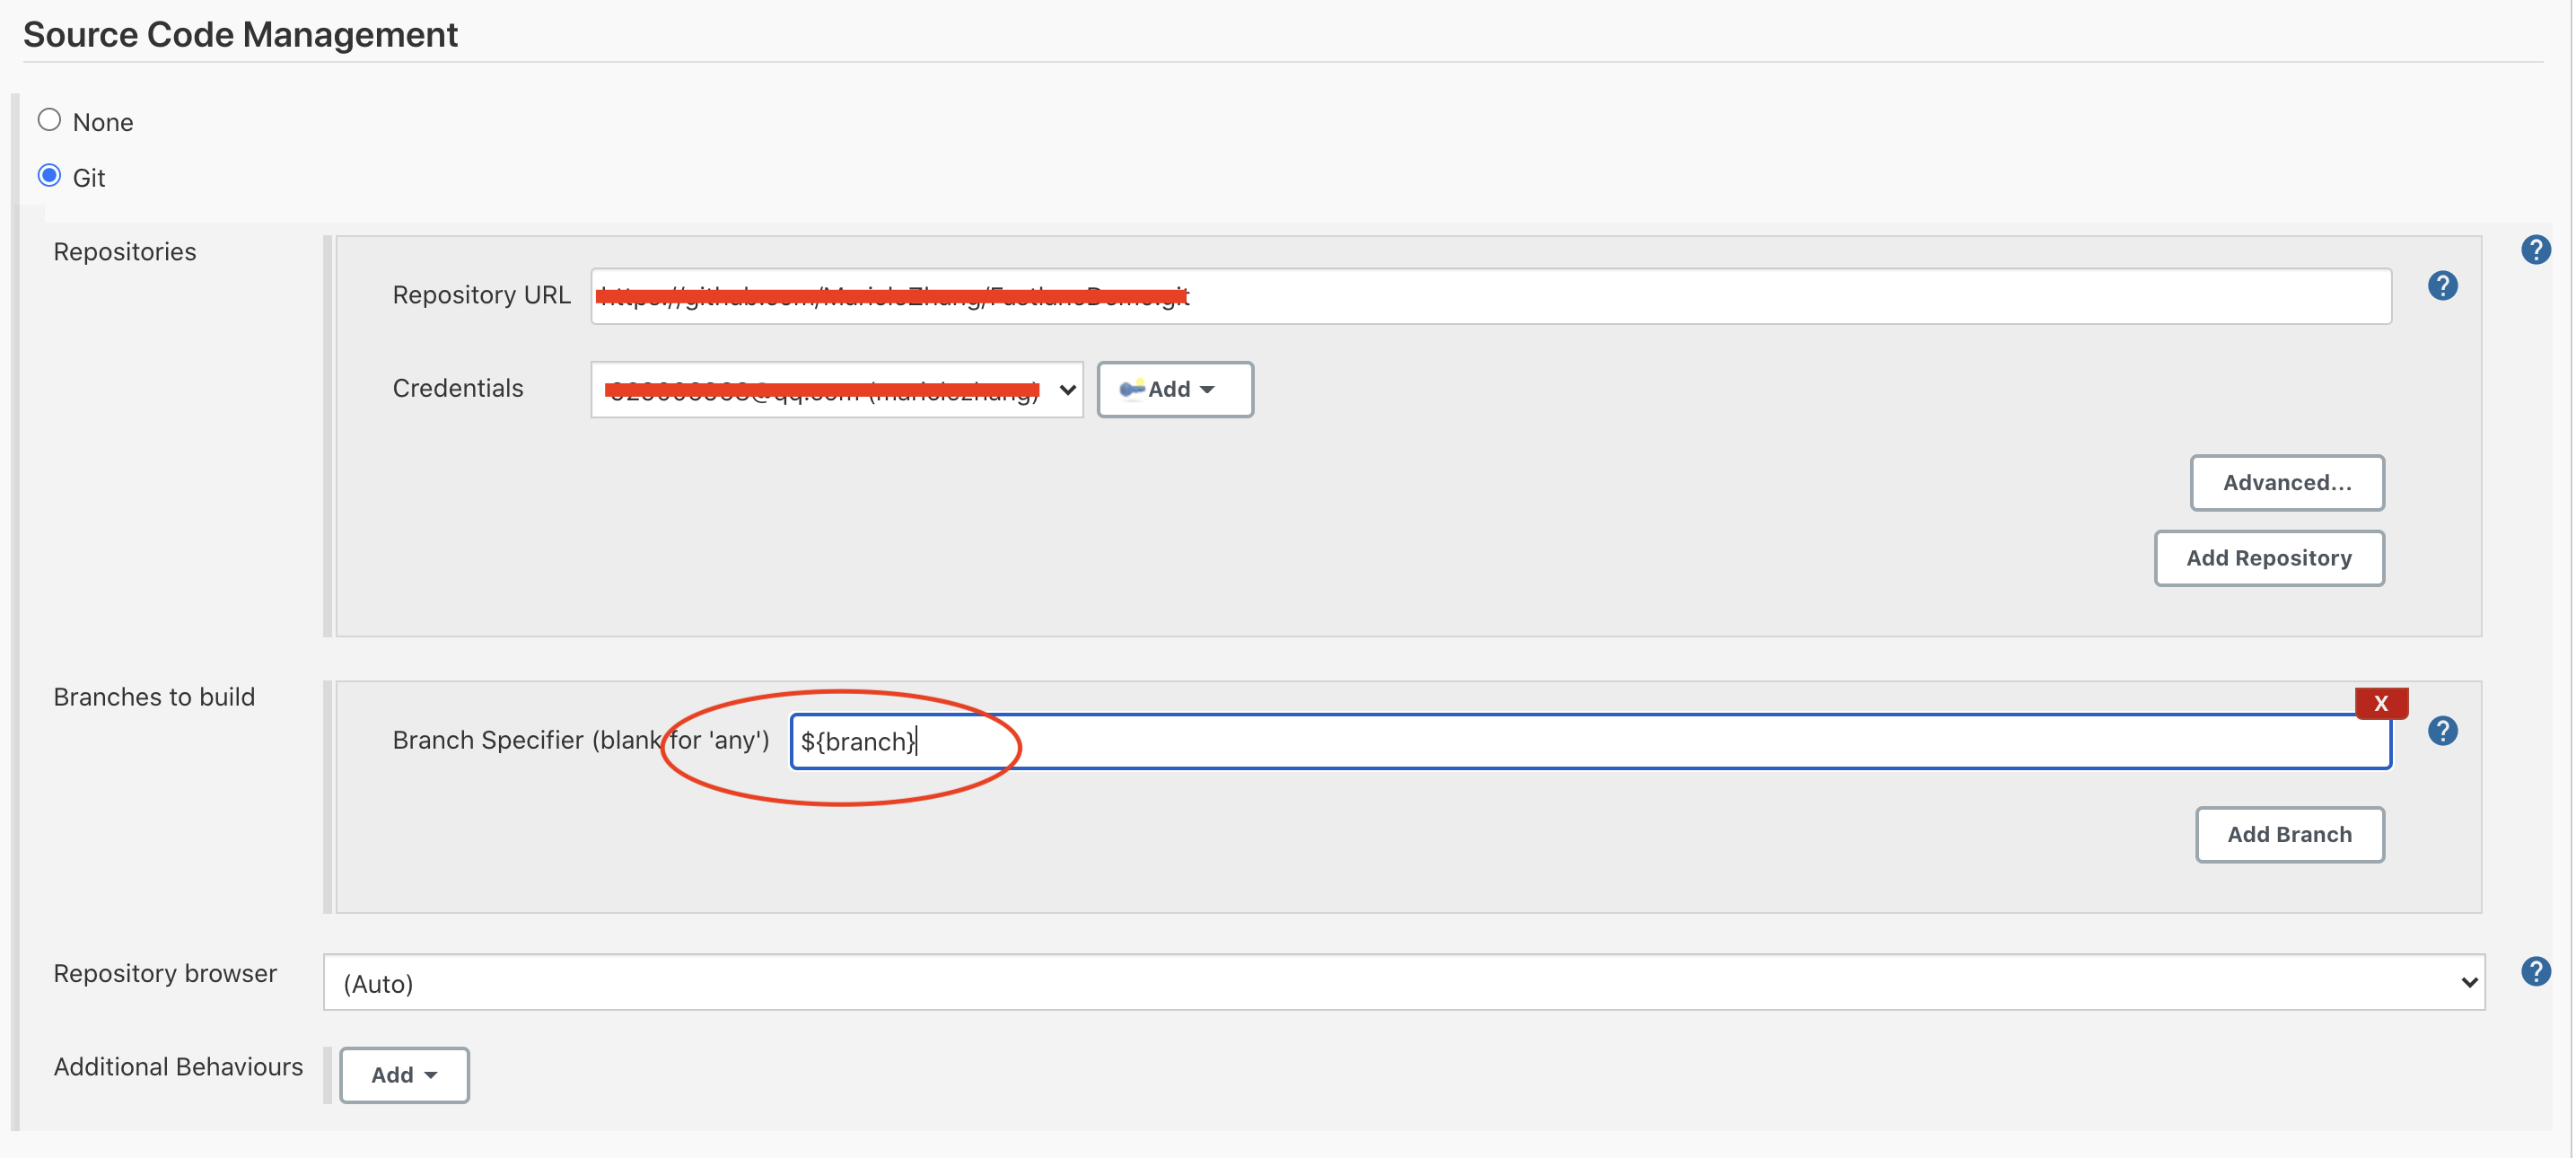
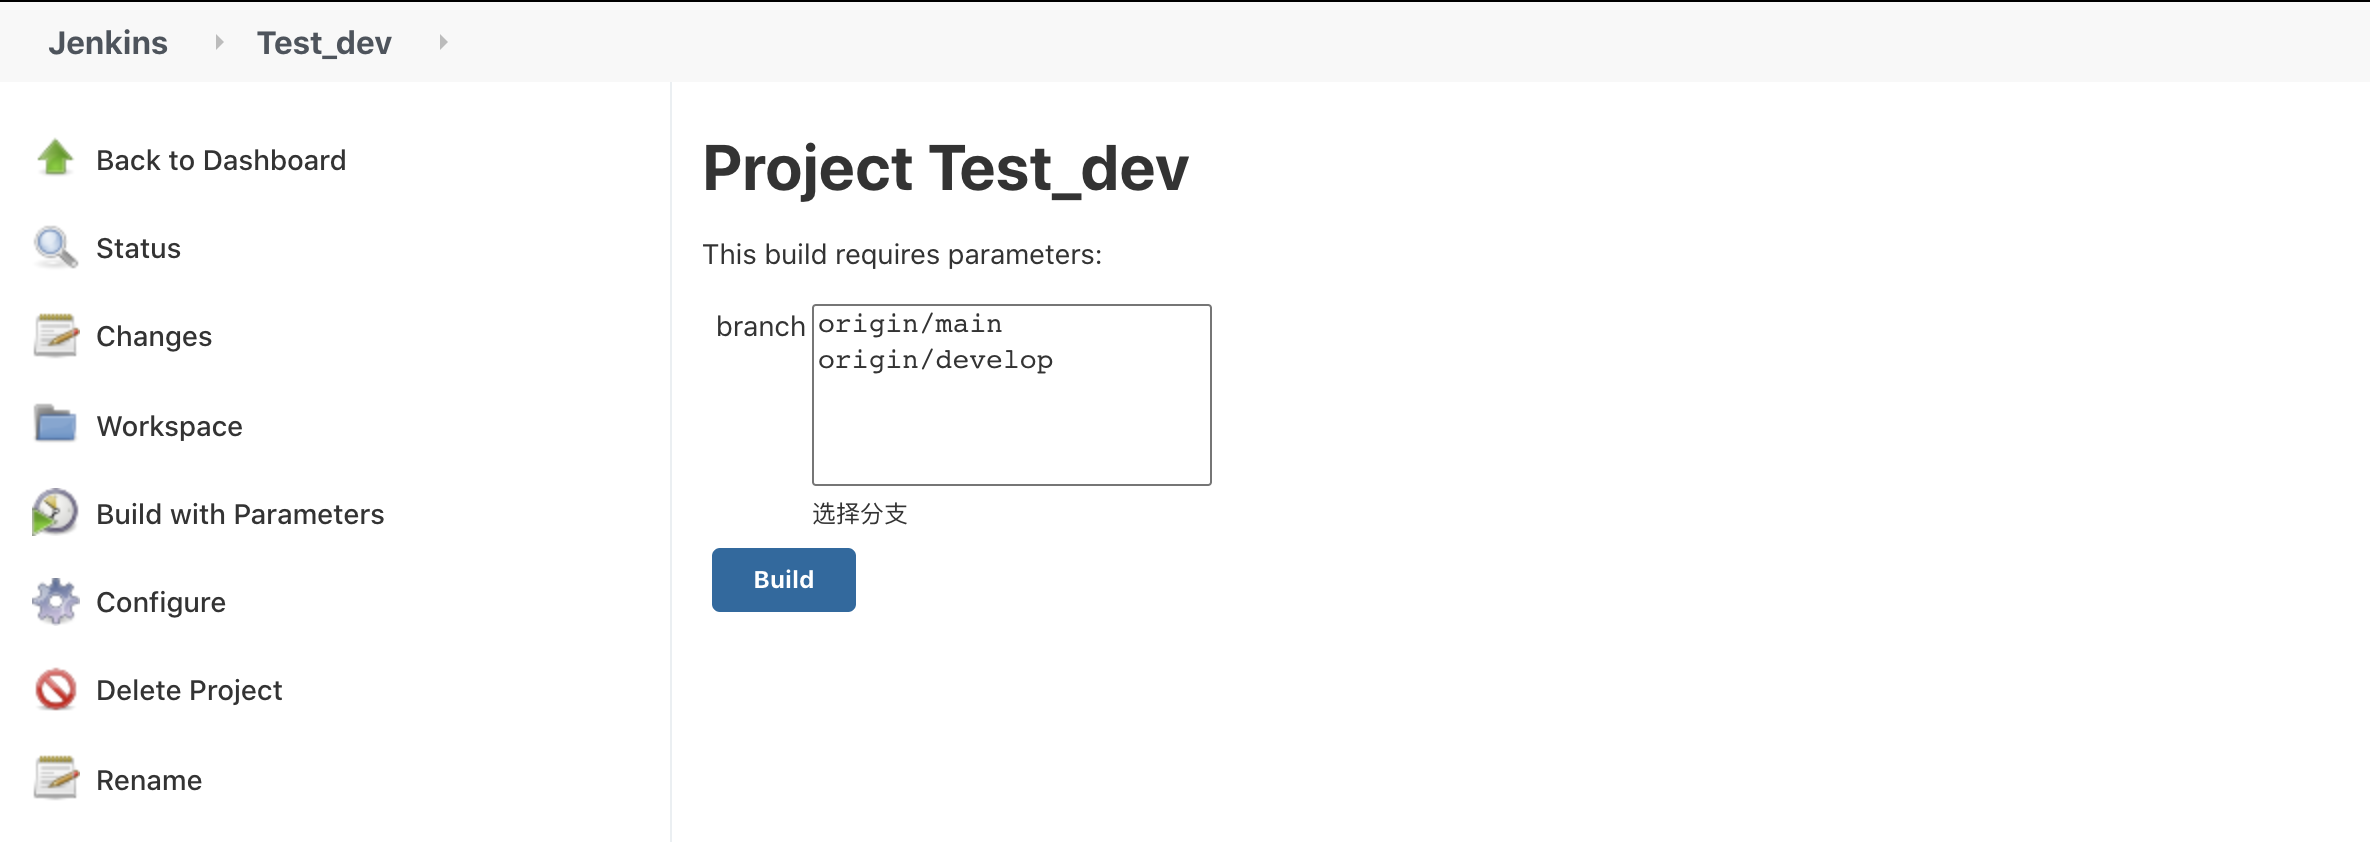
进入该任务界面,如下图说明配置成功
jenkins 执行脚本
编译打包
export MallocNanoZone=0
export LC_ALL=en_us.UTF-8

cd ${JENKINS_HOME}/workspace/${JOB_NAME} #进入项目目录下

pod update --verbose  # Pod 依赖

fastlane development # fastlane 自定义命令
上传到蒲公英
curl -F file=@/Users/zhangjian/.jenkins/workspace/JUApp-iOS/JUApp/build/JuApp.ipa -F buildInstallType=2 -F buildPassword=666 -F uKey=378617fba86912d68ddeda10fa9fbfc2 -F _api_key=1e9896673dc767184f8e3e2f8450a45f http://www.pgyer.com/apiv2/app/upload -X POST -H "enctype:multipart/form-data" > /tmp/upload_app.txt
url=$(cat /tmp/upload_app.txt|awk -F'"' '{print $(NF-1)}'|sed 's#\\##g')
echo "download_URL:<img src=$url>"
Fastlane
Fastlane 安装
选择xcode
xcode-select --install安装Fastlane
sudo gem install fastlane -NV初始化Fastlane
进入项目目录下执行
fastlane init 出现下面4个选项,选择4.自动执行bundle update需要几分钟时间
1. 📸 Automate screenshots //自动截屏
2. 👩✈️ Automate beta distribution to TestFlight //发布到TestFlight
3. 🚀 Automate App Store distribution //App Store
4. 🛠 Manual setup - manually setup your project to automate your tasks //自定义配置 执行完毕后会出现fastlane文件夹,有两个文件Appfile和Fastfile。
Appfile 配置apple id
 # app_identifier("[[APP_IDENTIFIER]]") # The bundle identifier of your app
# apple_id("[[APPLE_ID]]") # Your Apple email address

# For more information about the Appfile, see:
#     https://docs.fastlane.tools/advanced/#appfile
配置Fastlane 执行命令
default_platform(:ios)

platform :ios do
  desc "Description of what the lane does"
  lane :custom_lane do
    # add actions here: https://docs.fastlane.tools/actions
  end

  desc "打development包"
  lane :development do |options|
    clear_derived_data(derived_data_path: "./DerivedData") # 清除本地编译缓存
    match(type: "development", force_for_new_devices: false, readonly: true) # fastlane match 管理证书
    gym(scheme: "FastlaneDemo",
      workspace: "FastlaneDemo.xcworkspace",
      configuration: "Debug",
      export_method: "development",#打包的类型
      output_directory: "./build",#生成的ipa路径
      output_name: "FastlaneDemo.ipa",#生成的ipa文件名
      silent: false,
      include_symbols: true,# 是否包含符号表
      derived_data_path: "./DerivedData",
      # clean:true,
      xcargs: "-UseNewBuildSystem=NO"
  )
  end
end
优化功能
生成二维码
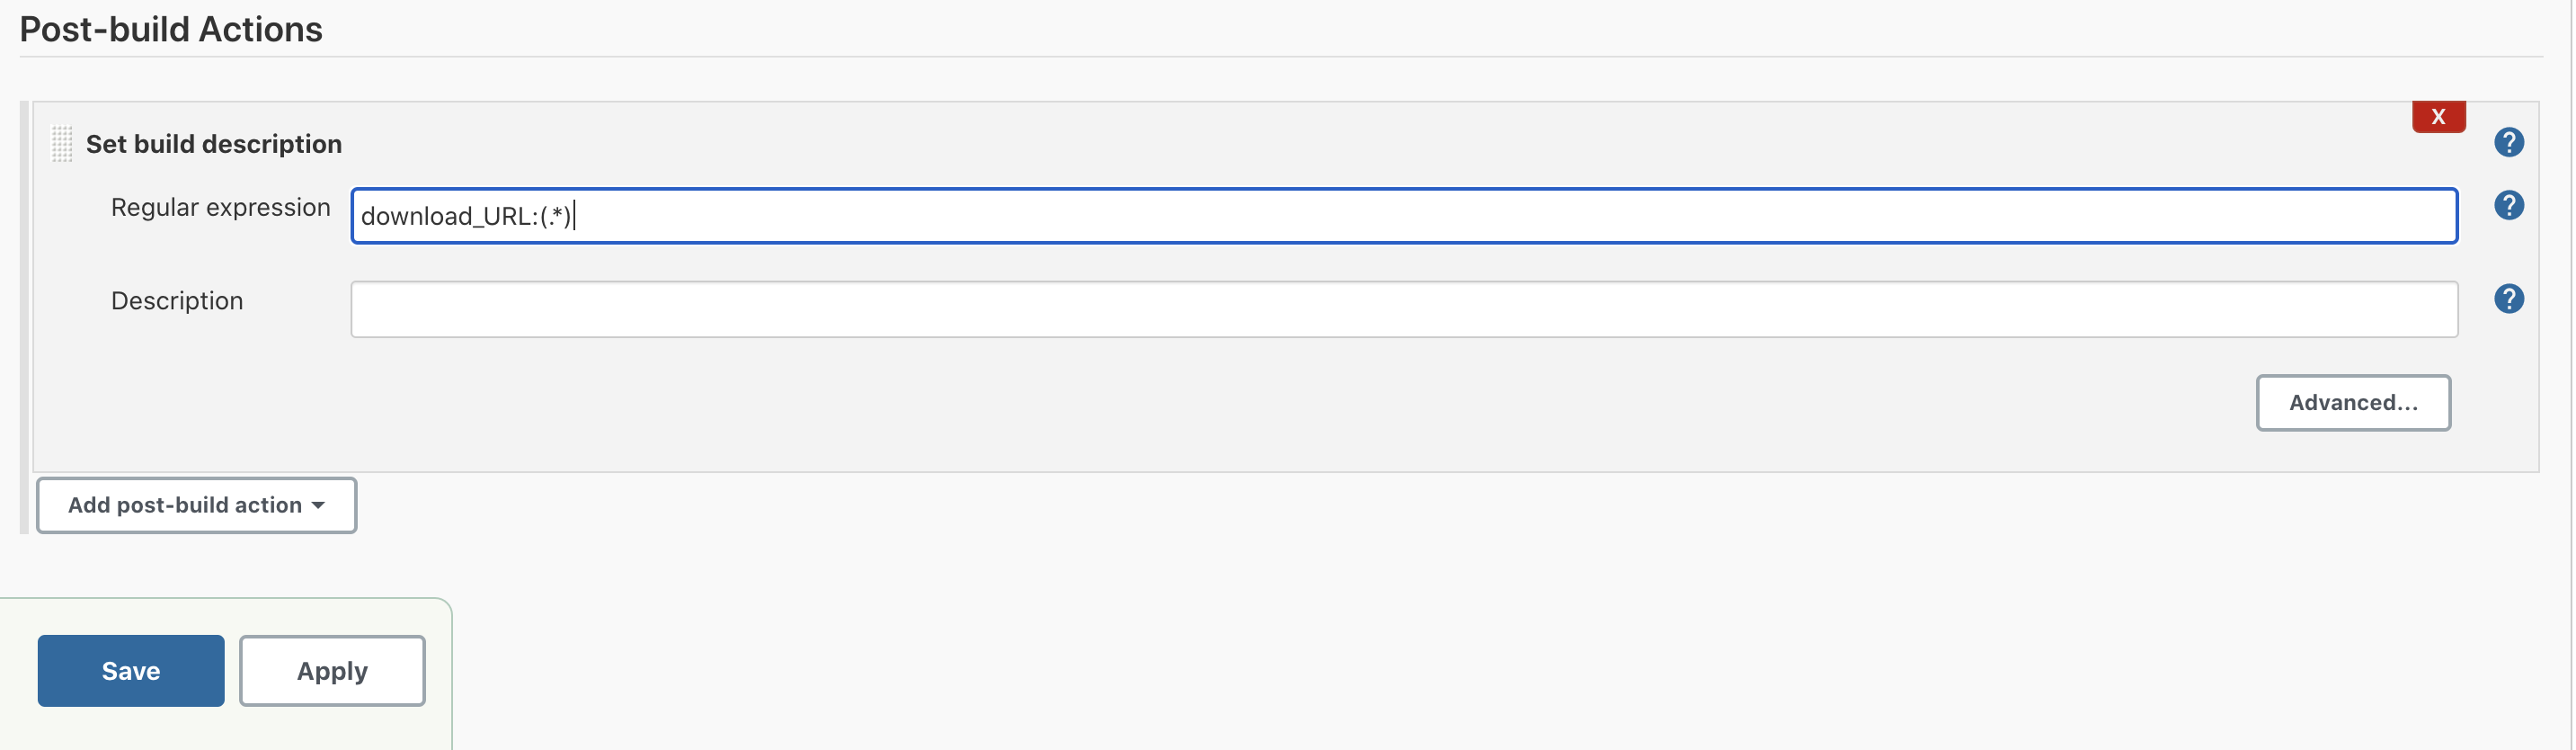
把二维码显示在首页中,需要安装一个插件description setter plugin 步骤:Manage Jenkins -> Plugin Manager->选择description setter plugin,安装完成后在项目配置中Post-build Actions ->Regular expression 添加
download_URL:(.*)如下图说明配置成功
发送到钉钉群
Manage Jenkins -> Plugin Manager 安装dingtalk插件,详情请参考jenkins钉钉插件
if [[ $dingtalk == true ]]; then
echo "=======================发送钉钉消息============================"
CHANGE_LOG=''
if [[ $gitlog == true ]]; then
CHANGE_LOG=`git log --pretty=format:"\n - %h - %an, %ar : %s" -5`
fi
if [ -z ${dingtalktoken} ]; then
dingtalktoken='钉钉access_token'
fi
POD_LOG=''
#POD_LOG=$(cat commit_log.txt)
data='{
"msgtype": "markdown",
"markdown": {
"title": "'${JOB_NAME}' iOS App下载",
"text": "\n ### '${JOB_NAME}'-'${BUILD_NUMBER}' \n ### '${branch}分支' \n\n '-------------' \n ### '备注:'\n '${marker}' \n '-------------' \n ### '主工程修改日志:' \n '${CHANGE_LOG}' \n '-------------' \n "
},
}'
curl "https://oapi.dingtalk.com/robot/send?access_token=${dingtalktoken}" -H "Content-Type: application/json" -d ''"${data}"''
if [[ $stable == true ]]; then
curl "https://oapi.dingtalk.com/robot/send?access_token="钉钉access_token" -H "Content-Type: application/json" -d ''"${data}"''
fi
fi上传到appstore
xcrun altool --upload-app -f '/Users/yangda/.jenkins/workspace/JUApp-appstore/JUApp/build/JuApp.ipa' -t ios --apiKey 'apiKey' --apiIssuer 'apiIssuer' --verbose
上传dSYM到Bugly
cp /Users/yangda/.jenkins/workspace/JUApp-appstore/JUApp/build/JuApp.app.dSYM.zip /Users/yangda/dsym/JuApp-${BUILD_NUMBER}.app.dSYM.zip

curl -k "https://api.bugly.qq.com/openapi/file/upload/symbol?app_key=9f197add-b20b-4f37-8025-279f500a36e5&app_id=6887020ef2" --form "api_version=1" --form "app_id=app_id" --form "app_key= app_key" --form "symbolType=2"  --form "bundleId=com.shanju.ju" --form "productVersion=1.0" --form "fileName=JuApp.app.dSYM.zip" --form "file=@/Users/yangda/.jenkins/workspace/JUApp-appstore/JUApp/build/JuApp.app.dSYM.zip" --verbose
常见问题
出现 fastlane: command not found
这个情况一般是由于 jenkins 没有设置正确的 PATH,在命令行输入
echo $PATHManage Jenkins -> Configure System 选中Environment variables 在 key 中填写 PATH,在 value 中填写第一步中输出的结果 保存即可。如下图所示

本博客所有文章除特别声明外,均采用 CC BY-SA 4.0 协议 ,转载请注明出处!